CLI
Introduction to Command Line
- Use the command line to perform operations in Linux.
- Search for files.
- Create and manage files.
- Install and update software.
Command-Line Mode Options
The command line interface provides the following advantages:
- No GUI overhead is incurred.
- Virtually any and every task can be accomplished while sitting at the command line.
- You can implement scripts for often-used (or easy-to-forget) tasks and series of procedures.
- You can sign into remote machines anywhere on the Internet.
- You can initiate graphical applications directly from the command line instead of hunting through menus.
- While graphical tools may vary among Linux distributions, the command line interface does not.
Using a Text Terminal on the Graphical Desktop
-
A terminal emulator program emulates (simulates) a standalone terminal within a window on the desktop.
-
By default, on GNOME desktop environments, the gnome-terminal application is used to emulate a text-mode terminal in a window. Other available terminal programs include:
The Command Line
-
Most input lines entered at the shell prompt have 3 basic elements:
- Command
- Options
- Arguments
-
The command is the name of the program you are executing. It may be followed by one or more options (or switches) that modify what the command may do.
-
Options usually start with one or two dashes, for example, -p or –print, in order to differentiate them from arguments, which represent what the command operates on.
However, plenty of commands have no options, no arguments, or neither. In addition, other elements (such as setting environment variables) can also appear on the command line when launching a task.
SUDO
- sudo allows users to run programs using the security privileges of another user, generally root (superuser).
Steps for Setting Up and Running sudo (If Sudo is not enabled)
- Make modifications as the administrative or superuser, root. While
sudowill become the preferred method of doing this, we do not have it set up yet, so we will usesuinstead. - At the command line prompt, type
suand press Enter. You will then be prompted for the root password, so enter it and press Enter. - Now,You will notice that nothing is printed; this is so others cannot see the password on the screen. You should end up with a different looking prompt, often ending with ‘#’. For example:
su
Password:
#
- Now, you need to create a configuration file to enable your user account to use
sudo. Typically, this file is created in the/etc/sudoers.d/directory with the name of the file the same as your username.- For example, for this demo, let’s say your username is student. After doing step 1, you would then create the configuration file for student by doing this:
# echo "student ALL=(ALL) ALL" > /etc/sudoers.d/student
- Finally, some Linux distributions will complain if you do not also change permissions on the file by doing:
# chmod 440 /etc/sudoers.d/student
- When using
sudo, by default you will be prompted to give a password (your own user password) at least the first time you do it within a specified time interval. - It is possible (though very insecure) to configure
sudoto not require a password or change the time window in which the password does not have to be repeated with everysudocommand.
Switching Between the GUI and the Command Line
- The customizable nature of Linux allows you to drop the graphical interface (temporarily or permanently) or to start it up after the system has been running.
- Linux production servers are usually installed without the GUI, and even if it is installed, usually do not launch it during system startup. Removing the graphical interface from a production server can be very helpful in maintaining a lean system, which can be easier to support and keep secure.
Virtual Terminals
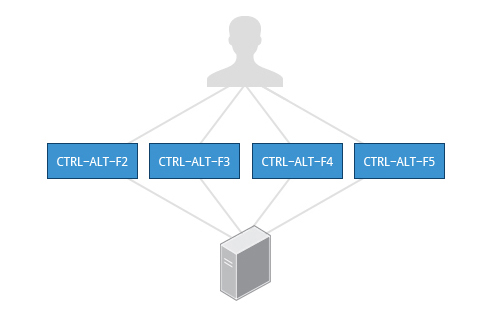
- Virtual Terminals (VT) are console sessions that use the entire display and keyboard outside of a graphical environment. Such terminals are considered “virtual” because, although there can be multiple active terminals, only one terminal remains visible at a time.
- A VT is not quite the same as a command line terminal window; you can have many of those visible at once on a graphical desktop.
- One virtual terminal (usually number one or seven) is reserved for the graphical environment, and text logins are enabled on the unused VT’s.
Ubuntu uses VT 7, but CentOS/RHEL and openSUSE use VT 1 for the graphical display.
- An example of a situation where using VT is helpful is when you run into problems with the graphical desktop. In this situation, you can switch to one of the text VT’s and troubleshoot.
- To switch between VT’s, press
CTRL-ALT-function keyfor the VT.- For example, press
CTRL-ALT-F6for VT 6. Actually, you only have to press theALT-F6key combination if you are in a VT and want to switch to another VT.
- For example, press
Turning Off the Graphical Desktop
- Linux distributions can start and stop the graphical desktop in various ways. The exact method differs from distribution and among distribution versions.
- For the newer systemd-based distributions, the display manager is run as a service, you can stop the GUI desktop with the
systemctlutility and most distributions will also work with thetelinitcommand, as in:
sudo systemctl stop gdm
#or
sudo telinit 3
#and restart it (after logging into the console) with:
sudo systemctl start gdm
#or
sudo telinit 5
On Ubuntu versions before 18.04 LTS, substitute lightdm for gdm.
Basic Operations
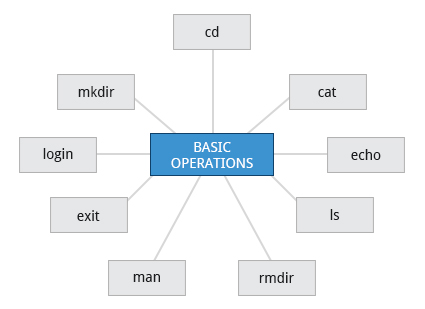
Logging In and Out
- An available text terminal will prompt for a username (with the string login:) and password. When typing your password, nothing is displayed on the terminal (not even a
*****to indicate that you typed in something), to prevent others from seeing your password. After you have logged into the system, you can perform basic operations.
Rebooting and Shutting Down
- The preferred method to shut down or reboot the system is to use the
shutdowncommand. This sends a warning message, and then prevents further users from logging in. - The init process will then control shutting down or rebooting the system. It is important to always shut down properly; failure to do so can result in damage to the system and/or loss of data.
- The
haltandpoweroffcommands issueshutdown -hto halt the system; rebootissuesshutdown -rand causes the machine to reboot instead of just shutting down.- Both rebooting and shutting down from the command line requires superuser (root) access.
- When administering a multi-user system, you have the option of notifying all users prior to shutdown, as in:
sudo shutdown -h 10:00 "Shutting down for scheduled maintenance."Getting Help
man command
man man
NAME
       man - an interface to the system reference manuals

SYNOPSIS
       man [man options] [[section] page ...] ...
       man -k [apropos options] regexp ...
       man -K [man options] [section] term ...
       man -f [whatis options] page ...
       man -l [man options] file ...
       man -w|-W [man options] page ...

DESCRIPTION
       man  is  the system's manual pager.  Each page argument given to man is normally the name of a program, utility or function.  The manual page associated with each of these arguments is then found and
       displayed.  A section, if provided, will direct man to look only in that section of the manual.  The default action is to search in all of the available sections following a  pre-defined  order  (see
       DEFAULTS), and to show only the first page found, even if page exists in several sections.

       The table below shows the section numbers of the manual followed by the types of pages they contain.

       1   Executable programs or shell commands
       2   System calls (functions provided by the kernel)
       3   Library calls (functions within program libraries)
       4   Special files (usually found in /dev)
       5   File formats and conventions, e.g. /etc/passwd
       6   Games
       7   Miscellaneous (including macro packages and conventions), e.g. man(7), groff(7), man-pages(7)
       8   System administration commands (usually only for root)
       9   Kernel routines [Non standard]
How to check, what sections/pages we have available?
man -f ls
ls (1)               - list directory contents
we see, ls has 1 page only.
Let’s use intro. This command in the introduction to Linux commands.
man -f intro
intro (1)            - introduction to user commands
intro (2)            - introduction to system calls
intro (3)            - introduction to library functions
intro (4)            - introduction to special files
intro (5)            - introduction to file formats and filesystems
intro (6)            - introduction to games
intro (7)            - introduction to overview and miscellany section
intro (8)            - introduction to administration and privileged commands
shows us multiple sections available.
Let’s play with them, and please remember, if you wish to quit, press q .
man 1 intro
man 8 intro
To quicly check what command do
whatis ls
ls (1)               - list directory contents
shows short description of the functionality.
The same is available with man:
man -f ls
ls (1)               - list directory contents

man -w ls \#returns the location of the file from where the page is rendered
/usr/share/man/man1/ls.1.gz

man -k ls \#searches for the given command through all man pages, and returns all of them as output.
Navigating File System
Accessing Directories
- When you first log into a system or open a terminal, the default directory should be your home directory. You can print the exact path of this by typing
echo $HOME. Many Linux distributions actually open new graphical terminals in$ HOME/Desktop. The following commands are useful for directory navigation:Command Result pwdDisplays the present working directory cd ~orcdChange to your home directory (shortcut name is ~ (tilde)) cd ..Change to parent directory (..) cd -Change to previous directory (- (minus))
Understanding Absolute and Relative Paths
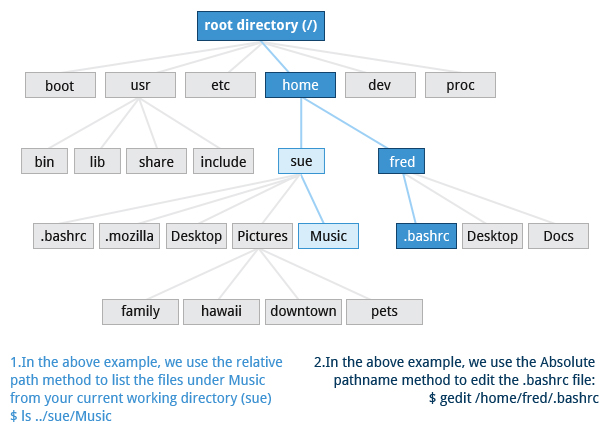
- For example, suppose you are currently working in your home directory and wish to move to the /usr/bin directory. The following two ways will bring you to the same directory from your home directory:
- Absolute path name method
cd /usr/bin - Relative path name method
cd ../../usr/bin
- Absolute path name method
There are two ways to identify paths:
- Absolute pathname : An absolute path name begins with the root directory and follows the tree, branch by branch, until it reaches the desired directory or file. Absolute paths always start with
/. - Relative pathname : A relative path name starts from the present working directory. Relative paths never start with
/. - Multiple slashes (
/) between directories and files are allowed, but all but one slash between elements in the path name is ignored by the system.////usr//binis valid, but seen as/usr/binby the system. - Most of the time, it is most convenient to use relative paths, which require less typing. Usually, you take advantage of the shortcuts provided by:
-
.(present directory), -
..(parent directory) and ~(your home directory).
-
Exploring the File system
Traversing up and down the file system tree can get tedious. The tree command is a good way to get a bird’s-eye view of the file system tree. Use tree -d to view just the directories and to suppress listing file names.
| Command | Usage |
|---|---|
cd / |
Changes your current directory to the root (/) directory (or path you supply) |
ls |
List the contents of the present working directory |
ls –a |
List all files, including hidden files and directories (those whose name start with . ) |
tree |
Displays a tree view of the file system |
List (ls)
This is the list command. It allows us to list the content of the directory.
ls
File-01.txt  file-01  notmyfile  notmyfile2
ls -la
total 100
drwx------ 7 root root 4096 Jun 11 07:18 .
drwxr-xr-x 19 root root 4096 Jun 8 05:40 ..
-rw-r--r-- 1 root root 3208 Jun 8 05:40 .bashrc
drwx------ 2 root root 4096 Jun 8 05:36 .ssh
drwxr-xr-x 2 root root 4096 Jun 8 05:40 .theia
-rw-r--r-- 1 root root 42118 Jun 11 07:18 File-01.txt
-rw-r--r-- 1 root root 0 Jun 11 07:18 file-01
lrwxrwxrwx 1 root root 1 Jun 8 05:40 filesystem -> /
-rw-r--r-- 1 testuser testuser 18 Jun 11 07:18 notmyfile
-rw-r--r-- 1 otheruser otheruser 19 Jun 11 07:18 notmyfile2Sorting
All lists can be sorted. There is no exception here.
Linux allows us to list files using multiple sorting options.
ls command has some options built-in. By default ls sorts the files alphabetically.
Linux has different timestamps, three, to be exact.
atime- the last time when file was accessedmtime- last modification time. By modification we mean change in the file content.ctime- last metadata modification time. We mean here - permissions change, location of the file, etc.
What is timestamp?
- This is the numerical representation of the time. It is the number of seconds passed from
Unix epochwhich is midnight of 1st of January, 1970.
Example how it looks is visible below
$ date +%s
1635797690
$ date
Mon 01 Nov 2021 08:14:52 PM UTC-
The first sort option will be
-t. This argument sorts files with the last modification time, newest files come first.ls -lt total 68 -rw-r--r-- 1 root root 42118 Jun 11 07:18 File-01.txt -rw-r--r-- 1 root root 18 Jun 11 07:18 file-01.txt -rw-r--r-- 1 root root 0 Jun 11 07:18 file-02 -rw-r--r-- 1 testuser testuser 18 Jun 11 07:18 notmyfile -rw-r--r-- 1 otheruser otheruser 19 Jun 11 07:18 notmyfile2 drwxr-xr-x 2 root root 4096 Jun 11 07:18 testDir drwxr-xr-x 3 root root 4096 Jun 11 07:18 testdir -rw-r--r-- 1 root root 0 Jun 11 07:18 file-01 drwx------ 3 root root 4096 Jun 11 07:15 snap lrwxrwxrwx 1 root root 1 Jun 8 05:40 filesystem -> /
We use two arguments, to observe things better. We can specify exactly the modification time by adding u to the argument list.
-
But please remember, in order to print this information properly you have to use
twith another argument (uin this case).ls -ltu total 68 -rw-r--r-- 1 root root 0 Jun 11 07:18 file-02 -rw-r--r-- 1 testuser testuser 18 Jun 11 07:18 notmyfile -rw-r--r-- 1 otheruser otheruser 19 Jun 11 07:18 notmyfile2 -rw-r--r-- 1 root root 42118 Jun 11 07:18 File-01.txt -rw-r--r-- 1 root root 0 Jun 11 07:18 file-01 -rw-r--r-- 1 root root 18 Jun 11 07:18 file-01.txt drwxr-xr-x 2 root root 4096 Jun 11 07:18 testDir drwxr-xr-x 3 root root 4096 Jun 11 07:18 testdir lrwxrwxrwx 1 root root 1 Jun 11 07:15 filesystem -> / drwx------ 3 root root 4096 Jun 11 07:15 snap -
List and order it by
ctime- metadata change.ls -ltc total 68 -rw-r--r-- 1 root root 42118 Jun 11 07:18 File-01.txt -rw-r--r-- 1 root root 18 Jun 11 07:18 file-01.txt -rw-r--r-- 1 root root 0 Jun 11 07:18 file-02 -rw-r--r-- 1 testuser testuser 18 Jun 11 07:18 notmyfile -rw-r--r-- 1 otheruser otheruser 19 Jun 11 07:18 notmyfile2 drwxr-xr-x 2 root root 4096 Jun 11 07:18 testDir drwxr-xr-x 3 root root 4096 Jun 11 07:18 testdir -rw-r--r-- 1 root root 0 Jun 11 07:18 file-01 drwx------ 3 root root 4096 Jun 11 07:15 snap lrwxrwxrwx 1 root root 1 Jun 8 05:40 filesystem -> /
Execute these commands and carefully observe the output
touch theNewestFile #(this creates a new file)

ls -ltu
total 68
-rw-r--r-- 1 root      root          0 Jun 11 07:43 theNewestFile
-rw-r--r-- 1 root      root          0 Jun 11 07:18 file-02
-rw-r--r-- 1 testuser  testuser     18 Jun 11 07:18 notmyfile
-rw-r--r-- 1 otheruser otheruser    19 Jun 11 07:18 notmyfile2
-rw-r--r-- 1 root      root      42118 Jun 11 07:18 File-01.txt
-rw-r--r-- 1 root      root          0 Jun 11 07:18 file-01
-rw-r--r-- 1 root      root         18 Jun 11 07:18 file-01.txt
drwxr-xr-x 2 root      root       4096 Jun 11 07:18 testDir
drwxr-xr-x 3 root      root       4096 Jun 11 07:18 testdir
lrwxrwxrwx 1 root      root          1 Jun 11 07:15 filesystem -> /
drwx------ 3 root      root       4096 Jun 11 07:15 snap

ls -ltc
total 68
-rw-r--r-- 1 root      root          0 Jun 11 07:43 theNewestFile
-rw-r--r-- 1 root      root      42118 Jun 11 07:18 File-01.txt
-rw-r--r-- 1 root      root         18 Jun 11 07:18 file-01.txt
-rw-r--r-- 1 root      root          0 Jun 11 07:18 file-02
-rw-r--r-- 1 testuser  testuser     18 Jun 11 07:18 notmyfile
-rw-r--r-- 1 otheruser otheruser    19 Jun 11 07:18 notmyfile2
drwxr-xr-x 2 root      root       4096 Jun 11 07:18 testDir
drwxr-xr-x 3 root      root       4096 Jun 11 07:18 testdir
-rw-r--r-- 1 root      root          0 Jun 11 07:18 file-01
drwx------ 3 root      root       4096 Jun 11 07:15 snap
lrwxrwxrwx 1 root      root          1 Jun  8 05:40 filesystem -> /

echo "hello world!" > file-02 (this will add something to the file)

ls -ltu
total 72
-rw-r--r-- 1 root      root          0 Jun 11 07:43 theNewestFile
-rw-r--r-- 1 root      root         13 Jun 11 07:18 file-02
-rw-r--r-- 1 testuser  testuser     18 Jun 11 07:18 notmyfile
-rw-r--r-- 1 otheruser otheruser    19 Jun 11 07:18 notmyfile2
-rw-r--r-- 1 root      root      42118 Jun 11 07:18 File-01.txt
-rw-r--r-- 1 root      root          0 Jun 11 07:18 file-01
-rw-r--r-- 1 root      root         18 Jun 11 07:18 file-01.txt
drwxr-xr-x 2 root      root       4096 Jun 11 07:18 testDir
drwxr-xr-x 3 root      root       4096 Jun 11 07:18 testdir
lrwxrwxrwx 1 root      root          1 Jun 11 07:15 filesystem -> /
drwx------ 3 root      root       4096 Jun 11 07:15 snap

ls -ltc
total 72
-rw-r--r-- 1 root      root         13 Jun 11 07:45 file-02
-rw-r--r-- 1 root      root          0 Jun 11 07:43 theNewestFile
-rw-r--r-- 1 root      root      42118 Jun 11 07:18 File-01.txt
-rw-r--r-- 1 root      root         18 Jun 11 07:18 file-01.txt
-rw-r--r-- 1 testuser  testuser     18 Jun 11 07:18 notmyfile
-rw-r--r-- 1 otheruser otheruser    19 Jun 11 07:18 notmyfile2
drwxr-xr-x 2 root      root       4096 Jun 11 07:18 testDir
drwxr-xr-x 3 root      root       4096 Jun 11 07:18 testdir
-rw-r--r-- 1 root      root          0 Jun 11 07:18 file-01
drwx------ 3 root      root       4096 Jun 11 07:15 snap
lrwxrwxrwx 1 root      root          1 Jun  8 05:40 filesystem -> /

chmod 444 file-01 #(this will change the permissions of the file)

ls -ltu
total 72
-rw-r--r-- 1 root      root          0 Jun 11 07:43 theNewestFile
-rw-r--r-- 1 root      root         13 Jun 11 07:18 file-02
-rw-r--r-- 1 testuser  testuser     18 Jun 11 07:18 notmyfile
-rw-r--r-- 1 otheruser otheruser    19 Jun 11 07:18 notmyfile2
-rw-r--r-- 1 root      root      42118 Jun 11 07:18 File-01.txt
-r--r--r-- 1 root      root          0 Jun 11 07:18 file-01
-rw-r--r-- 1 root      root         18 Jun 11 07:18 file-01.txt
drwxr-xr-x 2 root      root       4096 Jun 11 07:18 testDir
drwxr-xr-x 3 root      root       4096 Jun 11 07:18 testdir
lrwxrwxrwx 1 root      root          1 Jun 11 07:15 filesystem -> /
drwx------ 3 root      root       4096 Jun 11 07:15 snap

ls -ltc
total 72
-r--r--r-- 1 root      root          0 Jun 11 07:48 file-01
-rw-r--r-- 1 root      root         13 Jun 11 07:45 file-02
-rw-r--r-- 1 root      root          0 Jun 11 07:43 theNewestFile
-rw-r--r-- 1 root      root      42118 Jun 11 07:18 File-01.txt
-rw-r--r-- 1 root      root         18 Jun 11 07:18 file-01.txt
-rw-r--r-- 1 testuser  testuser     18 Jun 11 07:18 notmyfile
-rw-r--r-- 1 otheruser otheruser    19 Jun 11 07:18 notmyfile2
drwxr-xr-x 2 root      root       4096 Jun 11 07:18 testDir
drwxr-xr-x 3 root      root       4096 Jun 11 07:18 testdir
drwx------ 3 root      root       4096 Jun 11 07:15 snap
lrwxrwxrwx 1 root      root          1 Jun  8 05:40 filesystem -> /
The format contains a few columns. Let’s try to understand them:
- permissions: Kind of permission the object has.
- number of hard links: By default every object has 1 hard link.
- Owner: The owner of the object. It doesn’t mean who created it, but who owns it at this moment.
- Group: Owner belongs to the group (of users). This inforation is here too. This means that our ‘groupmates’ have specific access to the file.
- Size: File size in bytes.
- date and time of last modification of the object.
- file name.
Owner and group: Names of the users and groups → System keeps and translates them from numerical representation. These are UID for user identifier and GID for group identifier. We can list this information in numeric way, by entering the
ls -n command. This works like ls -l, but it changes the user-friendly names to UIDs and GIDs.
ls -n
total 68
-rw-r--r-- 1    0    0 42118 Jun 11 07:18 File-01.txt
-rw-r--r-- 1    0    0     0 Jun 11 07:18 file-01
-rw-r--r-- 1    0    0    18 Jun 11 07:18 file-01.txt
-rw-r--r-- 1    0    0     0 Jun 11 07:18 file-02
lrwxrwxrwx 1    0    0     1 Jun  8 05:40 filesystem -> /
-rw-r--r-- 1 1001 1001    18 Jun 11 07:18 notmyfile
-rw-r--r-- 1 1002 1002    19 Jun 11 07:18 notmyfile2
drwx------ 3    0    0  4096 Jun 11 07:15 snap
drwxr-xr-x 2    0    0  4096 Jun 11 07:18 testDir
drwxr-xr-x 3    0    0  4096 Jun 11 07:18 testdir
Few more useful commands:
# print the username of the creator of the file
`ls -al --author`

# prints directories only
`ls -ald`

# prints inodes (there will be a lesson about inodes)
`ls -ali`

# recursively prints all subdirectories
`ls -alR`

# prints list in the reversed order
`ls -alr`

# prints the version of the binary
`ls --version` -indicates that we will pass arguments. We have two ways here-one dash informs the system that we will pass one letter argument, like ‘l’--two dashes means that argument will contain more than one letter. Most commonly it will be an english word.
lmeans long listing format.
Sort content by size
ls -s
total 72
44 File-01.txt   0 file-01   4 file-01.txt   4 file-02   0 filesystem   4 notmyfile   4 notmyfile2   4 snap   4 testDir   4 testdir   0 theNewestFile
This shows the short list of files and allocated space. As we already know, we can combine this argument - s - with others. Let’s do it.
ls -ls
total 72
44 -rw-r--r-- 1 root      root      42118 Jun 11 07:18 File-01.txt
 0 -r--r--r-- 1 root      root          0 Jun 11 07:18 file-01
 4 -rw-r--r-- 1 root      root         18 Jun 11 07:18 file-01.txt
 4 -rw-r--r-- 1 root      root         13 Jun 11 07:45 file-02
 0 lrwxrwxrwx 1 root      root          1 Jun  8 05:40 filesystem -> /
 4 -rw-r--r-- 1 testuser  testuser     18 Jun 11 07:18 notmyfile
 4 -rw-r--r-- 1 otheruser otheruser    19 Jun 11 07:18 notmyfile2
 4 drwx------ 3 root      root       4096 Jun 11 07:15 snap
 4 drwxr-xr-x 2 root      root       4096 Jun 11 07:18 testDir
 4 drwxr-xr-x 3 root      root       4096 Jun 11 07:18 testdir
 0 -rw-r--r-- 1 root      root          0 Jun 11 07:43 theNewestFile
But this is what you have by default, using ls -l, right? No? You are correct, the answer is no. Take a look on the beginning of each line, this is where you can find, what was added by -s.
Why we used s? When capital S is used, this means sort.
ls -lS it sorts files by size, largest are going first.
So, arguments are case-sensitive, like… everything in Linux :)
-
--human-readable, or better --h-
ls -lhwe have printed the size of the files not in bytes, but in more readable form, withK,M, orG, that sort of things.ls -lh total 72K -rw-r--r-- 1 root root 42K Jun 11 07:18 File-01.txt -r--r--r-- 1 root root 0 Jun 11 07:18 file-01 -rw-r--r-- 1 root root 18 Jun 11 07:18 file-01.txt -rw-r--r-- 1 root root 13 Jun 11 07:45 file-02 lrwxrwxrwx 1 root root 1 Jun 8 05:40 filesystem -> / -rw-r--r-- 1 testuser testuser 18 Jun 11 07:18 notmyfile -rw-r--r-- 1 otheruser otheruser 19 Jun 11 07:18 notmyfile2 drwx------ 3 root root 4.0K Jun 11 07:15 snap drwxr-xr-x 2 root root 4.0K Jun 11 07:18 testDir drwxr-xr-x 3 root root 4.0K Jun 11 07:18 testdir -rw-r--r-- 1 root root 0 Jun 11 07:43 theNewestFile
-
-
huse the powers of 1024. So, 1K is a 1 powered by 1024. We have another option which uses powers of 1000.ls -l --si total 74k -rw-r--r-- 1 root root 43k Jun 11 07:18 File-01.txt -r--r--r-- 1 root root 0 Jun 11 07:18 file-01 -rw-r--r-- 1 root root 18 Jun 11 07:18 file-01.txt -rw-r--r-- 1 root root 13 Jun 11 07:45 file-02 lrwxrwxrwx 1 root root 1 Jun 8 05:40 filesystem -> / -rw-r--r-- 1 testuser testuser 18 Jun 11 07:18 notmyfile -rw-r--r-- 1 otheruser otheruser 19 Jun 11 07:18 notmyfile2 drwx------ 3 root root 4.1k Jun 11 07:15 snap drwxr-xr-x 2 root root 4.1k Jun 11 07:18 testDir drwxr-xr-x 3 root root 4.1k Jun 11 07:18 testdir -rw-r--r-- 1 root root 0 Jun 11 07:43 theNewestFilels -lSh total 72K -rw-r--r-- 1 root root 42K Jun 11 07:18 File-01.txt drwx------ 3 root root 4.0K Jun 11 07:15 snap drwxr-xr-x 2 root root 4.0K Jun 11 07:18 testDir drwxr-xr-x 3 root root 4.0K Jun 11 07:18 testdir -rw-r--r-- 1 otheruser otheruser 19 Jun 11 07:18 notmyfile2 -rw-r--r-- 1 root root 18 Jun 11 07:18 file-01.txt -rw-r--r-- 1 testuser testuser 18 Jun 11 07:18 notmyfile -rw-r--r-- 1 root root 13 Jun 11 07:45 file-02 lrwxrwxrwx 1 root root 1 Jun 8 05:40 filesystem -> / -r--r--r-- 1 root root 0 Jun 11 07:18 file-01 -rw-r--r-- 1 root root 0 Jun 11 07:43 theNewestFile
Navigating the Directory History
- The
cdcommand remembers where you were last, and lets you get back there withcd -. - For remembering more than just the last directory visited, use
pushdto change the directory instead ofcd; this pushes your starting directory onto a list. - Using
popdwill then send you back to those directories, walking in reverse order (the most recent directory will be the first one retrieved withpopd). - The list of directories is displayed with the
dirscommand.
Working with Files and Directories
Locating Applications
- Depending on the specifics of particular distribution’s policy, programs and software packages can be installed in various directories.
- In general, executable programs and scripts should live in the
/bin,/usr/bin,/sbin,/usr/sbindirectories, or- somewhere under
/opt. - They can also appear in
/usr/local/binand/usr/local/sbin, or - in a directory in a user’s account space, such as
/home/student/bin.
- One way to locate programs is to employ the
whichutility. For example, to find out exactly where the diff program resides on the file system:
which diff
/usr/bin/diff- If
whichdoes not find the program,whereisis a good alternative because it looks for packages in a broader range of system directories:
whereis diff
diff: /usr/bin/diff /usr/share/man/man1/diff.1.gz /usr/share/man/man1p/diff.1p.gz
as well as locating source and man files packaged with the program.
Working with Files
Viewing Files
| Command | Usage |
|---|---|
cat |
Used for viewing files that are not very long; it does not provide any scroll-back. |
tac |
Used to look at a file backwards, starting with the last line. |
less |
Used to view larger files because it is a paging program. It pauses at each screen full of text, provides scroll-back capabilities, and lets you search and navigate within the file.NOTE: Use / to search for a pattern in the forward direction and ? for a pattern in the backward direction. An older program named more is still used, but has fewer capabilities: “less is more”. |
tail |
Used to print the last 10 lines of a file by default. You can change the number of lines by doing -n 15 or just -15 if you wanted to look at the last 15 lines instead of the default. |
head |
The opposite of tail; by default, it prints the first 10 lines of a file. |
Creating, Updating and Modifying Files
-
touchis often used to set or update the access, change, and modify times of files. -
By default, it resets a file’s timestamp to match the current time.However, you can also create an empty file using
touch:touch <filename>This is normally done to create an empty file as a placeholder for a later purpose. -
**touch**provides several useful options.-
For example, the
-toption allows you to set the date and timestamp of the file to a specific value, as in:touch -t 12091600 myfileThis sets the myfile file’s timestamp to 4 p.m., December 9th (12 09 1600).
-
mkdir and rmdir
-
mkdiris used to create a directory: -
mkdir sampdirIt creates a sample directory namedsampdirunder the current directory. -
mkdir /usr/sampdirIt creates a sample directory calledsampdirunder/usr. -
create multiple directories with similar names
mkdir testdir{1..10} mkdir mydirectory anotherdirectory thirddirectory -
In order to create deeper structure, we have to use
-pargument. This allows us to create the whole structure, without creating parent directory as first step.mkdir -p parentdir/childdir{01..100}with
-pwe allowed the system to create parent directory and the second part we already know. Under theparentdirwe created 100 files, fromchilddir001tochilddir100. Please notice, how nice it is formatted by the system! We said01, but system created directories to keet three digits as it is inchilddir100. -
Removing a directory is done with
rmdir. -
The directory must be empty or the command will fail.
-
To remove a directory and all of its contents you have to do
rm -rf.
Moving, Renaming or Removing a File
mvdoes double duty, in that it can:- Simply rename a file
- Move a file to another location, while possibly changing its name at the same time.
- If you are not certain about removing files that match a pattern you supply, it is always good to run
rminteractively (rm –i) to prompt before every removal.Command Usage mvRename a file rmRemove a file rm –fForcefully remove a file rm –iInteractively remove a file
Renaming or Removing a Directory
rmdirworks only on empty directories; otherwise you get an error.- While typing
rm –rfis a fast and easy way to remove a whole file system tree recursively, it is extremely dangerous and should be used with the utmost care, especially when used by root (recall that recursive means drilling down through all sub-directories, all the way down a tree).Command Usage mvRename a directory rmdirRemove an empty directory rm -rfForcefully remove a directory recursively
Searching for Files
- The main tools for doing this are the
locateandfindutilities.
locate
-
The
locateutility program performs a search taking advantage of a previously constructed database of files and directories on your system, matching all entries that contain a specified character string. This can sometimes result in a very long list. -
To get a shorter (and possibly more relevant) list, we can use the
grepprogram as a filter.grepwill print only the lines that contain one or more specified strings, as in:locate zip | grep binwhich will list all the files and directories with both zip and bin in their name.
-
locateutilizes a database created by a related utility,updatedb. -
Most Linux systems run this automatically once a day. However, you can update it at any time by just running
updatedbfrom the command line as the root user.
The find Program
findrecurses down the filesystem tree from any particular directory (or set of directories) and locates files that match specified conditions. The default pathname is always the present working directory.- For example, administrators sometimes scan for potentially large core files (which contain diagnostic information after a program fails) that are more than several weeks old in order to remove them.
- It is also common to remove files in inessential or outdated files in /tmp (and other volatile directories, such as those containing cached files) that have not been accessed recently.
Using find
-
When no arguments are given,
findlists all files in the current directory and all of its sub directories. Commonly used options to shorten the list include-name(only list files with a certain pattern in their name),
-iname(also ignore the case of file names), and-type(which will restrict the results to files of a certain specified type, such asdfor directory,lfor symbolic link, orffor a regular file, etc.). -
Searching for files and directories named gcc:
find /usr -name gcc -
Searching only for directories named gcc:
find /usr -type d -name gcc -
Searching only for regular files named gcc:
find /usr -type f -name gcc
Using Advanced find Options
-
Another good use of
findis being able to run commands on the files that match your search criteria. The-execoption is used for this purpose. -
To find and remove all files that end with
.swp:find -name "*.swp" -exec rm {} ’;’ -
The
{}(squiggly brackets) is a placeholder that will be filled with all the file names that result from the find expression, and the preceding command will be run on each one individually. -
Please note that you have to end the command with either ‘
;’ (including the single-quotes) or “\;”. Both forms are fine. -
One can also use the
-okoption, which behaves the same as-exec, except thatfindwill prompt you for permission before executing the command. This makes it a good way to test your results before blindly executing any potentially dangerous commands.
Finding Files Based on Time and Size
-
To find files based on time:
find / -ctime 3 -
Here,
-ctimeis when the inode metadata (i.e. file ownership, permissions, etc.) last changed; it is often, but not necessarily, when the file was first created. -
You can also search for accessed/last read (
-atime) or modified/last written (-mtime) times. -
The number is the number of days and can be expressed as either a number (
n) that means exactly that value,**+n**, which means greater than that number, or-n, which means less than that number. There are similar options for times in minutes (as in-cmin,-amin, and-mmin). -
To find files based on sizes:
find / -size 0Note the size here is in 512-byte blocks, by default; you can also specify bytes (c), kilobytes (k), megabytes (M), gigabytes (G), etc.
-
As with the time numbers above, file sizes can also be exact numbers (
n),+nor-n. -
For example, to find files greater than 10 MB in size and running a command on those files:
find / -size +10M -exec command {} ’;’ -
To search for files using the
?wildcard, replace each unknown character with?.- For example, if you know only the first two letters are ‘ba’ of a three-letter filename with an extension of .out, type ls ba?.out.
Wildcards and Matching File Names
You can search for a filename containing specific characters using wildcards.
| Wildcard | Result |
|---|---|
? |
Matches any single character |
* |
Matches any string of characters |
[set] |
Matches any character in the set of characters, for example [adf] will match any occurrence of a, d, or f |
[!set] |
Matches any character not in the set of characters |
- To search for files using the
*wildcard, replace the unknown string with*.- For example, if you remember only that the extension was
.out, typels *.out
- For example, if you remember only that the extension was
Hard and Soft Links
Hard Links
-
The
lnutility is used to create hard links and (with the-soption) soft links, also known as symbolic links or symlinks. These two kinds of links are very useful in UNIX-based operating systems. -
Suppose that file1 already exists. A hard link, called file2, is created with the command:
ln file1 file2ls -li file1 file2
49302296 -rw-r--r-- 2 student student 0 Oct 24 2024 file1
49302296 -rw-r--r-- 2 student student 0 Oct 24 2024 file2-
The
-ioption tolsprints out in the first column the inode number, which is a unique quantity for each file object. This field is the same for both of these files; what is really going on here is that it is only one file, but it has more than one name associated with it, as is indicated by the 2 that appears in the ls output. Thus, there was already another object linked to file1 before the command was executed. -
Hard links are very useful and they save space. For one thing, if you remove either file1 or file2 in the example, the inode object (and the remaining file name) will remain, which might be undesirable, as it may lead to subtle errors later if you recreate a file of that name.
-
If you edit one of the files, exactly what happens depends on your editor; most editors, including vi and gedit, will retain the link by default, but it is possible that modifying one of the names may break the link and result in the creation of two objects.
Soft (Symbolic) Links
- Soft (or Symbolic) links are created with the
-soption, as in:
ln -s file1 file3`

ls -li file1 file3`
49302296 -rw-r--r-- 2 student student 0 Oct 24 2024 file1
49302397 lrwxrwxrwx 1 student student 5 Oct 24 2024 file3 -> file1- Symbolic links take no extra space on the file system (unless their names are very long). They are extremely convenient, as they can easily be modified to point to different places. An easy way to create a shortcut from your home directory to long path names is to create a symbolic link.
- Unlike hard links, soft links can point to objects even on different file systems, partitions, and/or disks and other media, which may or may not be currently available or even exist. In the case where the link does not point to a currently available or existing object, you obtain a dangling link.
Advanced Shell Features
Modifying the Command Line Prompt
-
The PS1 variable is the character string that is displayed as the prompt on the command line.
-
Most distributions set PS1 to a known default value, which is suitable in most cases. However, users may want custom information to show on the command line.
-
For example, some system administrators require the user and the host system name to show up on the command line as in:
student@c8 $
-
-
This could prove useful if you are working in multiple roles and want to be always reminded of who you are and what machine you are on. The prompt above could be implemented by setting the PS1 variable to:
\u@\h \$- For example:
$ echo $PS1 $ $ PS1="\u@\h \$ " student@c8 $ echo $PS1 \u@\h \$ student@c8 $ -
By convention, most systems are set up so that the root user has a pound sign (
#) as their prompt.
Standard File Streams
When commands are executed, by default there are three standard file streams (or descriptors) always open for use:
- standard input (standard in or
stdin), - standard output (standard out or
stdout) and - standard error (or
stderr)
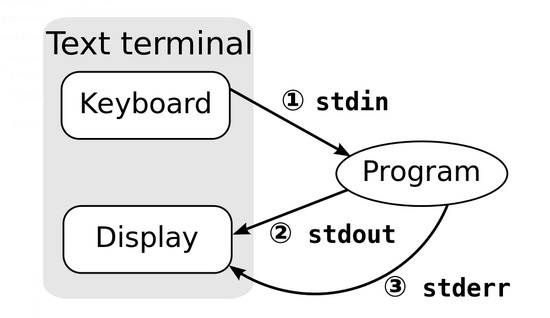
| Name | Symbolic Name | Value | Example |
|---|---|---|---|
| standard input | stdin |
0 | keyboard |
| standard output | stdout |
1 | terminal |
| standard error | stderr |
2 | terminal |
-
Usually,
stdinis your keyboard, andstdoutandstderrare printed on your terminal. -
stderris often redirected to an error logging file, whilestdinis supplied by directing input to come from a file or from the output of a previous command through a pipe. -
stdoutis also often redirected into a file. Sincestderris where error messages are written, usually nothing will go there. -
In Linux, all open files are represented internally by what are called file descriptors. Simply put, these are represented by numbers starting at zero.
stdinis file descriptor 0,stdoutis file descriptor 1, andstderris file descriptor 2.
-
Typically, if other files are opened in addition to these three, which are opened by default, they will start at file descriptor 3 and increase from there.
I/O Redirection
-
Through the command shell, we can redirect the three standard file streams so that we can get input from either a file or another command, instead of from our keyboard, and we can write output and errors to files or use them to provide input for subsequent commands.
-
For example, if we have a program called do_something that reads from stdin and writes to stdout and stderr, we can change its input source by using the less-than sign (<) followed by the name of the file to be consumed for input data:
do_something < input-file
-
-
If you want to send the output to a file, use the greater-than sign (>) as in:
do_something > output-file -
Because stderr is not the same as stdout, error messages will still be seen on the terminal windows in the above example.
-
If you want to redirect stderr to a separate file, you use stderr’s file descriptor number (2), the greater-than sign (>), followed by the name of the file you want to hold everything the running command writes to stderr:
do_something 2> error-file**`
-
A special shorthand notation can send anything written to file descriptor 2 (stderr) to the same place as file descriptor 1 (stdout):
2>&1.do_something > all-output-file 2>&1 # bash permits an easier syntax for the above: do_something >& all-output-file
Pipes
-
The UNIX/Linux philosophy is to have many simple and short programs (or commands) cooperate together to produce quite complex results, rather than have one complex program with many possible options and modes of operation.
-
In order to accomplish this, extensive use of pipes is made. You can pipe the output of one command or program into another as its input.
-
In order to do this, we use the vertical-bar, pipe symbol (
|), between commands as in:command1 | command2 | command3 -
The above represents what we often call a pipeline, and allows Linux to combine the actions of several commands into one. This is extraordinarily efficient because command2 and command3 do not have to wait for the previous pipeline commands to complete before they can begin hacking at the data in their input streams; on multiple CPU or core systems, the available computing power is much better utilized and things get done quicker.
-
Furthermore, there is no need to save output in (temporary) files between the stages in the pipeline, which saves disk space and reduces reading and writing from disk, which is often the slowest bottleneck in getting something done.